In today’s fast-paced world, finding time for a full, elaborate makeup routine can be challenging, especially during busy mornings. However, a quick and effortless everyday makeup routine is the perfect solution for those looking to enhance their appearance while saving time. Whether you’re getting ready for work, a casual outing, or simply want to feel confident in your daily look, a 15-minute makeup routine can be both practical and effective. Here’s a step-by-step guide to achieving a fresh, natural, and polished look in just 15 minutes.
Step 1: Prep Your Skin (2-3 minutes)
Before applying any makeup, it’s essential to prepare your skin. This step will ensure that your makeup stays intact throughout the day and that your skin looks healthy and radiant.
- Cleanse: Start by cleansing your face to remove any dirt, oil, or impurities that have accumulated overnight. Use a gentle cleanser that suits your skin type to avoid irritation or dryness.
- Moisturize: After cleansing, apply a lightweight moisturizer to hydrate your skin. If you have dry skin, go for a richer moisturizer; for oily skin, a gel-based or oil-free moisturizer works best.
- Prime: Using a makeup primer is optional but recommended, especially if you have larger pores or want your makeup to last longer. A mattifying primer can help control oil, while a hydrating primer adds a dewy finish. Apply a thin layer all over your face or to areas that need extra attention.
Step 2: Apply Foundation or Tinted Moisturizer (3 minutes)
The next step is to even out your complexion. You can use either foundation or a tinted moisturizer, depending on your skin’s needs and desired coverage.
- Foundation: For a full-coverage look, choose a foundation that matches your skin tone. Use a brush, sponge, or your fingers to apply it evenly to your face. Focus on areas that require more coverage, such as redness or blemishes, and blend the foundation down your neck to avoid harsh lines.
- Tinted Moisturizer: If you prefer a lighter, more natural look, a tinted moisturizer or BB cream is a great option. These products provide light coverage while hydrating the skin. They are ideal for days when you don’t need full coverage but want to even out your skin tone.
- Concealer: If needed, apply concealer to specific areas, such as under the eyes, around the nose, or on any blemishes. Blend it out with a sponge for a seamless finish.
Step 3: Add a Touch of Color (2 minutes)
Now that your complexion is flawless, it’s time to add some color to your face. A little blush, bronzer, and highlighter will bring life back to your skin.
- Blush: Using a cream blush or a powder blush, smile and apply the product to the apples of your cheeks. Blend it upwards toward your temples for a natural flush. Cream blushes blend better into the skin for a dewy finish, while powder blushes are easier to build up for more intensity.
- Bronzer: To add warmth and dimension, apply a bronzer along the contours of your face. Sweep it along your cheekbones, forehead, and jawline, blending well to avoid harsh lines.
- Highlighter: A subtle highlighter on the high points of your face will create a healthy, lit-from-within glow. Apply it to the tops of your cheekbones, along your brow bone, and on your Cupid’s bow.
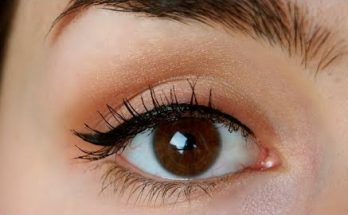
Step 4: Define Your Eyes (4 minutes)
Eyes are often the focal point of everyday makeup. Even with minimal products, defining your eyes can make a significant difference in your overall look.
- Eyebrows: Start by filling in your eyebrows to frame your face. Use a pencil or powder that matches your hair color. Gently fill in any sparse areas and shape your brows to enhance their natural arch. Brush through them with a spoolie to blend the product and give them a soft, natural look.
- Eyeshadow: Choose a neutral eyeshadow palette with shades like beige, taupe, or soft brown. Apply a light, matte shade all over your eyelid for a base. Use a slightly darker shade in the crease to add depth and dimension, blending well with a fluffy brush. For a bit of shimmer, add a light shimmer shade to the center of your eyelid or inner corner.
- Mascara: Finish off your eye makeup by applying mascara to your lashes. A coat or two of mascara will open up your eyes and make them look brighter and more awake. Wiggle the wand at the roots of your lashes and sweep upward for maximum volume and length.
Step 5: Perfect Your Lips (2 minutes)
Your lips should complement your natural look without drawing too much attention. Here are a few simple ways to finish off your everyday makeup.
- Lip Balm: Start with a hydrating lip balm to keep your lips soft and smooth.
- Lip Gloss: If you want a touch of shine, apply a clear or tinted lip gloss. Gloss will give your lips a plump, youthful appearance without feeling heavy or cakey.
- Lipstick or Lip Liner: For a more defined look, you can apply a nude or soft pink lipstick. Lip liners are also a great option to subtly enhance your lips’ shape and prevent feathering.
Step 6: Set Your Makeup (1-2 minutes)
To ensure your makeup stays in place throughout the day, setting it with a setting spray or powder is key.
- Setting Powder: Lightly dust translucent powder over your T-zone or areas that tend to get oily. This will mattify the skin and keep your makeup from shifting.
- Setting Spray: For a dewy finish, or to lock your makeup in place, use a setting spray. Hold the spray at arm’s length and mist over your face. This step adds a fresh, natural finish to your makeup.
Conclusion
With just 15 minutes, you can achieve a fresh and polished look that enhances your natural features without overwhelming your routine. This everyday makeup tutorial is all about using a few key products to create a simple yet effective look that boosts your confidence and helps you tackle the day with ease. By following these steps and adapting them to your own preferences, you can look your best without spending hours in front of the mirror.