Drawing realistic lips can be challenging, but with the right techniques and understanding of common mistakes, you can create lifelike and expressive lips. Many beginners struggle with proportions, shading, and structure, often leading to flat or unnatural-looking drawings. In this tutorial, we will cover the Don’ts (mistakes to avoid) and Do’s (best practices) to help you improve your lip-drawing skills step by step.
Step 1: Understanding the Basic Structure of Lips
Before drawing, it’s important to understand the structure of the lips. The lips are not just two curved lines; they have volume, shape, and symmetry. The top lip is generally more curved and has a dip in the middle (the cupid’s bow), while the bottom lip is fuller and rounder. The corners of the mouth connect the lips and create natural folds when smiling or speaking.
Don’t: Start with a Single Outline
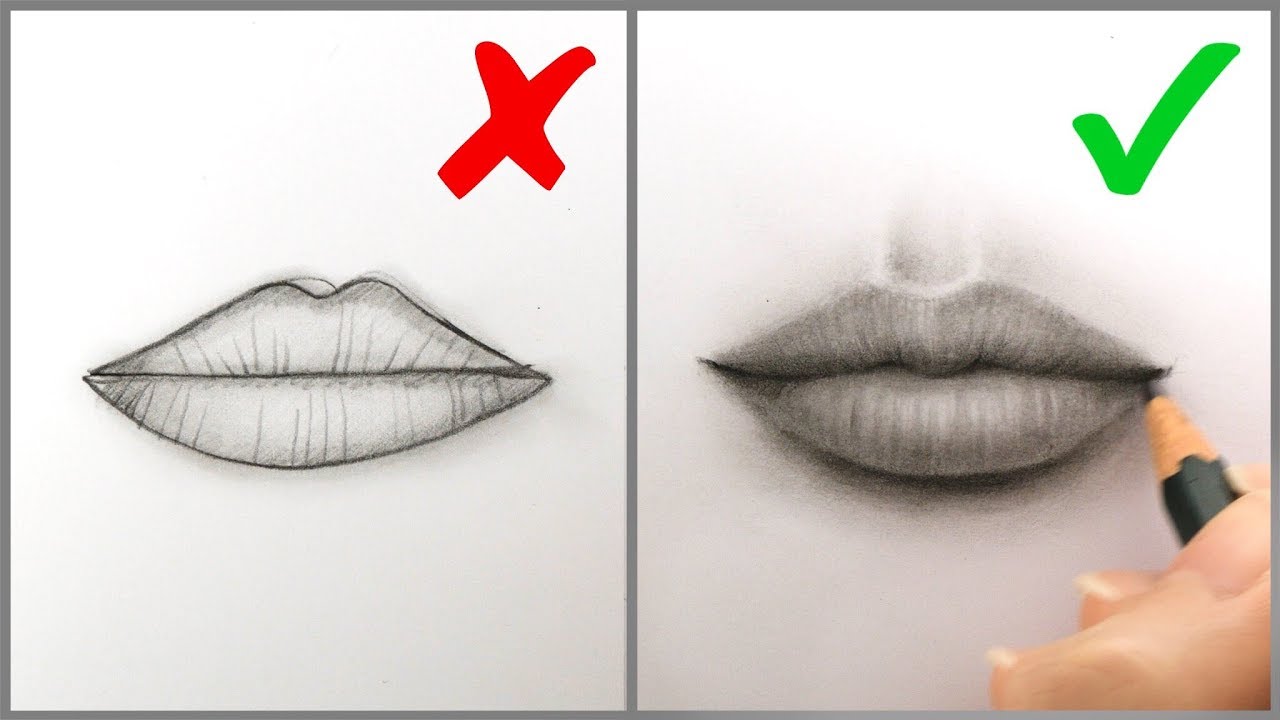
A common mistake beginners make is drawing lips using a single curved outline. This often results in a cartoonish or unnatural look because real lips have depth and shading that define their shape.
Do: Use Construction Guidelines
Start with light guidelines. Draw a horizontal line to mark the mouth opening and use gentle curves to shape the upper and lower lips. Lightly sketch the Cupid’s bow at the top and create a soft curve for the bottom lip. These guides help maintain symmetry and proportion.
Step 2: Adding Depth and Shape
Once the basic structure is in place, you need to add volume and shape. Lips aren’t flat; they have highlights and shadows that define their form.
Don’t: Make Lips Too Flat or Overly Defined
If you draw lips with just an outline and fill them in with a solid tone, they will appear unnatural. Overly harsh lines make them look stiff rather than soft and realistic.
Do: Build Volume with Light Sketching
Instead of relying on bold outlines, use light pencil strokes to build up the shape. Define the edges softly and focus on the natural curves and folds of the lips.
Step 3: Shading for a Realistic Look
Shading is key to achieving a realistic effect. It gives the lips depth and makes them appear three-dimensional.
Don’t: Shade the Entire Lip in One Tone
A mistake many beginners make is applying the same level of darkness across the lips. This can make them look flat and unnatural.
Do: Use Gradient Shading
Lips have highlights and shadows due to their natural texture. Follow these steps for effective shading:
- Darken the corners and the crease where the lips meet.
- Keep the middle of the lower lip lighter to show natural light reflection.
- Blend smoothly using a blending stump or soft tissue. Avoid harsh lines.
Step 4: Adding Texture and Fine Details
To make the lips look even more realistic, add subtle texture such as natural lines and creases.
Don’t: Draw Hard, Straight Lines on the Lips
Some beginners add straight lines across the lips to show texture, but this often makes them look artificial and exaggerated.
Do: Use Soft, Curved Lines
The natural creases on the lips follow their shape. Use gentle, curved strokes to suggest texture without overdoing it. You can also erase small areas to create natural highlights.
Step 5: Refining and Blending for a Natural Look
The final step is refining your drawing by adjusting shadows, blending, and adding highlights.
Don’t: Leave Harsh Edges
Lips should blend naturally into the skin around them. Avoid leaving a sharp outline between the lips and the surrounding area.
Do: Blend the Edges Softly
Use a light touch to blend the lip edges into the surrounding skin tone. A kneaded eraser can help soften highlights and enhance the realism of the drawing.
Final Thoughts
Drawing realistic lips takes practice, but by avoiding common mistakes and following these step-by-step techniques, you’ll improve significantly. Remember:
✅ Use guidelines to structure the lips.
✅ Build volume with soft strokes instead of bold outlines.
✅ Apply gradient shading for a three-dimensional effect.
✅ Add natural creases and highlights without over-exaggerating.
✅ Blend softly for a smooth and natural finish.
With consistent practice and attention to detail, your lip drawings will look more realistic and expressive over time! Keep sketching and refining your technique, and soon, drawing lips will feel effortless.