Drawing a realistic eye can be one of the most challenging aspects of portraiture, but it’s also incredibly rewarding. Whether you’re just starting to learn how to draw or you’re refining your technique, mastering how to draw an eye can significantly improve your overall skills. The best part? You don’t need multiple pencils or fancy tools to create a stunning eye drawing. In this tutorial, we will teach you how to draw a realistic eye step by step using only one pencil—perfect for beginners.
Let’s dive into the process of drawing a lifelike eye, with tips and tricks that will help you develop your skills along the way!
What You’ll Need:
- One Pencil – A basic pencil (preferably HB or 2B).
- Paper – Any type of drawing paper works; smooth paper is easier to blend.
- Eraser – For adjusting highlights and fine details.
- Blending Tool (Optional) – Your finger or a blending stump to smooth out shading.
Step 1: Draw the Outline of the Eye (1 minute)
The first step is to sketch the basic outline of the eye. Start with a light hand to avoid heavy lines.
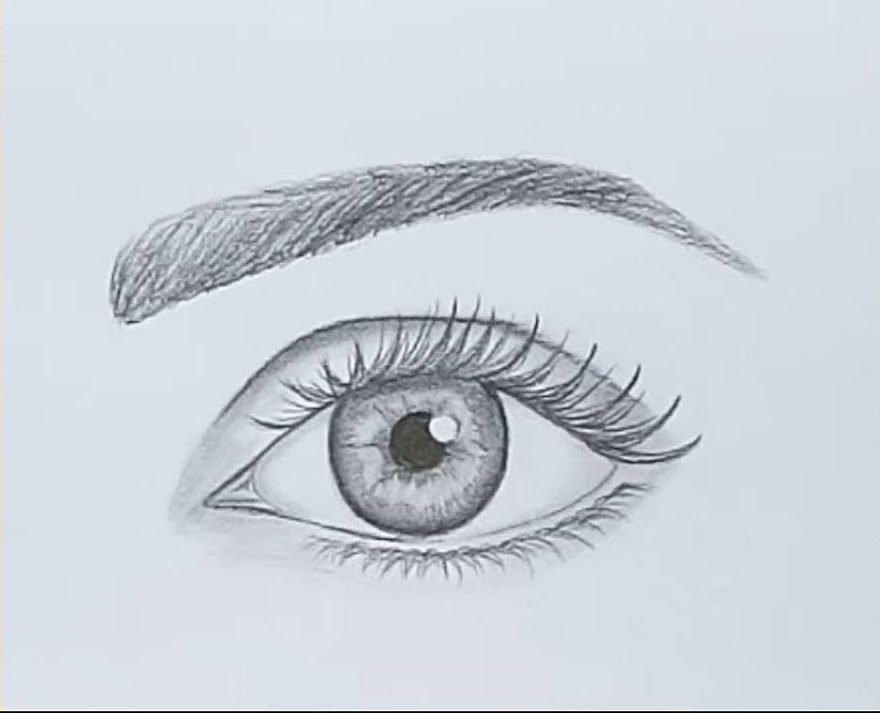
- Start with a Shape: Draw an almond shape for the outline of the eye. It doesn’t need to be perfect; this is just the basic structure. The upper part of the almond shape should be slightly more curved than the bottom, as the upper eyelid tends to be more prominent.
- Sketch the Iris: Inside the almond shape, draw a circle to represent the iris (the colored part of the eye). Make sure the top of the iris is partially covered by the eyelid. The circle should be centered in the middle of the almond shape.
- Pupil: In the center of the iris, draw a smaller circle to represent the pupil. The pupil is usually black, so this circle will become darker when you add shading later.
Step 2: Draw the Eyelids and Eyelashes (1 minute)
The eyelids and eyelashes help define the eye’s shape and give it more dimension.
- Upper Eyelid: Draw a curved line above the iris that follows the shape of the almond. This line represents the upper eyelid. Make sure the curve is subtle and not too harsh.
- Lower Eyelid: Draw a similar curve below the iris for the lower eyelid. The lower eyelid is usually softer and less defined than the upper lid.
- Eyelashes: Use small, short strokes along the upper eyelid to represent eyelashes. Eyelashes grow in different directions, so be sure to make them irregular. They should also gradually get longer as you move towards the outer corner of the eye.
Step 3: Shade the Iris and Pupil (1 minute)
Now it’s time to add depth and shading to the iris and pupil. You can use just one pencil to achieve this!
- Shade the Iris: Using light, gentle strokes, shade the iris. Start from the edge of the iris and move toward the pupil, leaving some white space near the center. The iris is not a solid color but rather has some variation. The outer part is usually darker, and the inner part near the pupil is lighter. Use your pencil to create a gradient effect.
- Shade the Pupil: The pupil is completely dark, so use firm pressure to shade it completely black. Be sure not to leave any white spaces here.
- Refine the Iris Texture: Using your pencil, add small, circular lines that radiate out from the center of the pupil to create texture in the iris. These lines will help make your eye look more realistic and lifelike.
Step 4: Add Shading to the Eyelids and Around the Eye (1 minute)
Shading is crucial to making your drawing look three-dimensional and realistic.
- Shade the Upper Eyelid: Gently shade the area beneath the upper eyelid with light, soft strokes. The eyelid casts a shadow on the eyeball, so it should be darker than the surrounding areas. Focus on the part of the eyelid that overlaps the iris.
- Shade the Lower Eyelid: The lower eyelid is usually lighter, but you can add a light shadow right under the iris to give it more depth.
- Shading Around the Eye: The skin around the eye tends to have subtle shadows, so use a light touch to shade around the outer edge of the eye and the bridge of the nose. Keep the shading smooth and even to mimic the soft curves of the skin.
Step 5: Add Highlights and Refine Details (1 minute)
Highlights make the eye look realistic and give it life. This step is key to making the eye stand out.
- Add Highlights to the Iris: Use your eraser to gently lift some graphite from the iris. Focus on creating a small, reflective spot of light in the upper part of the iris. This mimics the natural shine of the eye.
- Highlight the Pupil: You can also add a small highlight on the pupil to make it look more realistic. Erase a tiny spot near the center to represent light reflecting off the eye.
- Refine the Eyelashes and Eyelids: Darken the lashes and eyelids by going over the lines and adding a little more shading where necessary. This helps make the eyelashes stand out and gives the eye more definition.
Step 6: Smooth and Blend (1 minute)
To complete the drawing, it’s important to blend the pencil strokes so that everything looks smooth and cohesive.
- Blend the Shading: Use your finger or a blending stump to blend the shading around the iris and eyelids. This will help create soft transitions between the light and dark areas.
- Blend the Skin Areas: Gently blend the skin around the eye to give it a smooth, natural appearance. Avoid over-blending—leave some texture in the eyelids and the iris to keep the drawing realistic.
- Final Touches: Take a step back and review your drawing. Darken any areas that need more definition, and refine the highlights. Add any final small details, like subtle wrinkles around the eye or small veins in the sclera (the white part of the eye).
Conclusion
Drawing a realistic eye doesn’t have to be difficult, even as a beginner. By following this simple step-by-step process using just one pencil, you can achieve impressive results. The key is to practice regularly, pay attention to details, and embrace shading techniques that help give your eye drawing depth and dimension.
With patience and persistence, you’ll soon be drawing lifelike eyes with ease. Keep practicing and experimenting, and you’ll continue to see improvement in your skills!