Drawing realistic facial features can be challenging, but knowing what not to do is just as important as knowing what to do! Many beginners struggle with common mistakes that make their drawings look flat, unbalanced, or unnatural. In this tutorial, we’ll break down the DOs and DON’Ts of drawing lips, eyes, noses, and hair, helping you improve your technique and create more lifelike portraits.
1. How to Draw Lips – DOs & DON’Ts
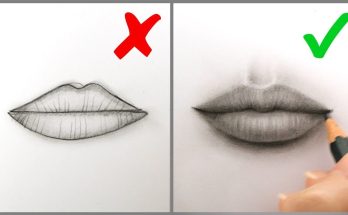
❌ DON’T:
- Draw lips as a simple harsh outline—real lips don’t have a clear border.
- Make both the top and bottom lips the same size—this looks unnatural.
- Use only one shade—lips have highlights and shadows that add depth.
✅ DO:
✔ Start with soft guidelines to define the lip shape.
✔ Observe how the upper lip is usually thinner and darker, while the bottom lip is fuller and catches more light.
✔ Blend shading smoothly to create a natural texture.
✔ Add a slight highlight in the center of the lower lip to create volume.
Tip: Lips are not just two curves meeting in the middle. Look at references and notice how the corners of the mouth blend into the face.
2. How to Draw Eyes – DOs & DON’Ts
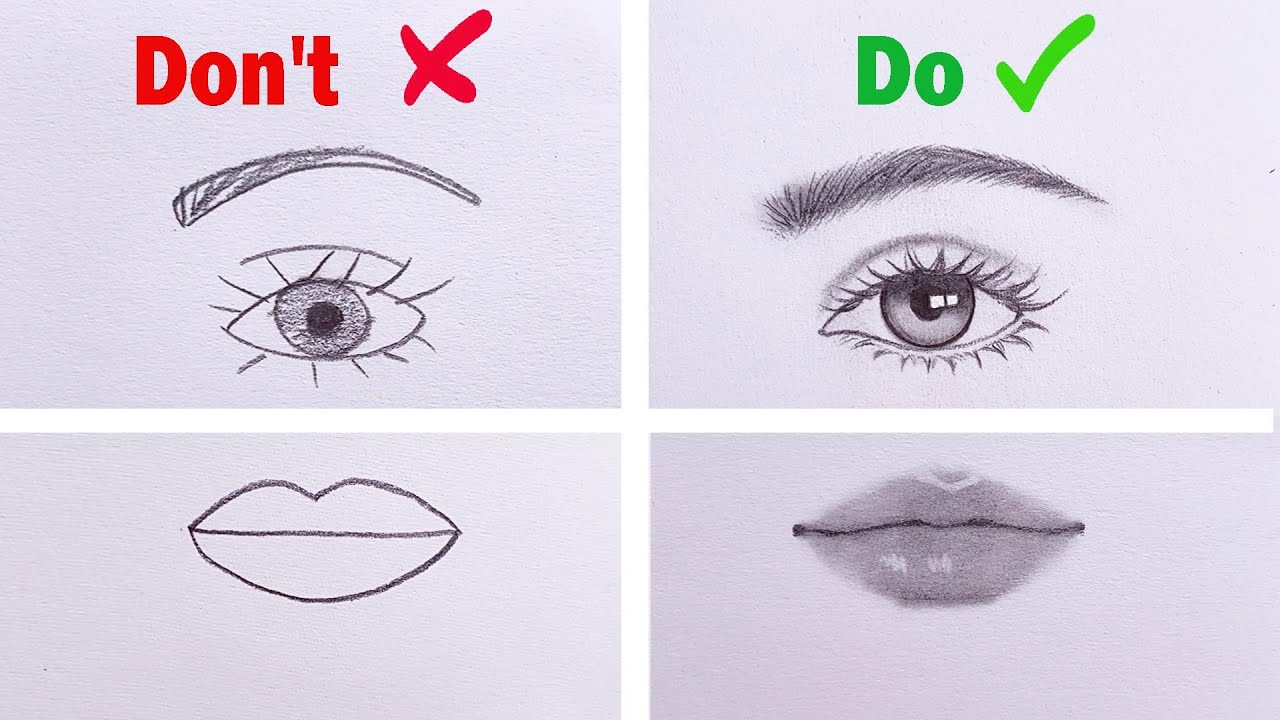
❌ DON’T:
- Draw an oval shape with a dot in the center—it looks cartoonish.
- Make the sclera (white of the eye) completely white—this makes the drawing look unnatural.
- Draw thick, symmetrical eyelashes—real lashes are varied in length and direction.
✅ DO:
✔ Start with a realistic almond shape, including the tear duct and eyelid creases.
✔ Add soft shading to the white of the eye—eyes are not pure white!
✔ Focus on light reflections in the pupil and iris to bring the eye to life.
✔ Use different pencil strokes for natural-looking eyelashes, making them curve gently instead of sticking straight out.
Tip: The iris has layers of details—use blending techniques and circular strokes to make it more realistic.
3. How to Draw a Nose – DOs & DON’Ts
❌ DON’T:
- Draw a nose using harsh outlines—real noses don’t have strong lines defining them.
- Make both nostrils too symmetrical—this looks unnatural.
- Forget about light and shadow—a nose has volume and depth.
✅ DO:
✔ Use subtle shading instead of outlines to define the nose structure.
✔ Pay attention to light direction—the bridge of the nose is usually lighter, while the nostrils and underside are darker.
✔ Blend softly to create a gradual transition from light to shadow.
✔ Use reference photos to observe different nose shapes.
Tip: Think of the nose as a 3D structure with curves and slopes—don’t just draw what you think a nose looks like!
4. How to Draw Hair – DOs & DON’Ts
❌ DON’T:
- Draw hair as individual strands—this looks messy and unnatural.
- Use only one tone—real hair has depth and highlights.
- Forget about the hair’s direction and flow.
✅ DO:
✔ Start with soft, overall shapes before adding texture.
✔ Use layered shading techniques to create depth—dark base layers first, then mid-tones, then highlights.
✔ Follow the natural direction of hair growth to make it flow realistically.
✔ Add highlights sparingly to enhance volume and movement.
Tip: Use a kneaded eraser to lift out highlights for a more natural look.
Final Thoughts
Mastering realistic drawing takes practice, but avoiding these common mistakes will instantly improve your art. Whether you’re drawing lips, eyes, noses, or hair, remember to focus on shading, proportions, and natural flow rather than relying on harsh outlines.
By following these DOs and DON’Ts, you’ll see a big difference in your drawings. Keep practicing, observe real-life references, and most importantly—have fun with your art!
Which feature do you struggle with the most? Let me know in the comments!